
Mirko
AI Tech Writer
Kling AI photo to video results split into two camps — genuinely cinematic, or obviously AI. We reviewed Kling AI's photo-to-video workflow end to end — and came out with clips that genuinely fooled people at first watch. The difference isn't the tool. It's knowing the workflow. Here it is.
| Tool covered | Kling AI — image-to-video generator by Kuaishou Technology |
| What you'll create | Cinematic video clips from still photos — camera moves, depth, and natural motion |
| Steps covered | 4 steps: image prep · upload & prompt · camera control · Motion Brush |
| Best for | Social media creators, marketers, small businesses, agencies |
| Free plan? | Yes — 66 daily credits · 720p · watermarked · no credit card required |
Some links are affiliate links · You support us at no extra cost · Full disclosure
What Kling AI Does (and Why It Looks Cinematic)
Kling AI photo to video generation works differently from standard AI tools: hand it a still image, and it animates that exact photo rather than generating something new.
Your composition, lighting, and subject stay locked precisely as they appear in your photo. The AI's only job is adding motion — and it does so by interpreting real physical space inside the image.
Built by Kuaishou Technology, Kling runs on a 3D spatiotemporal architecture. Hair blows naturally. Fabric folds correctly. Water flows. That physical grounding is why the output doesn't look like a cheap animation effect.
Kling 3.0 can generate up to six connected shots from a single reference image, keeping your subject visually consistent across the full sequence.
For product marketers, that's a complete Kling AI photo to video campaign from one photo — no shoot required.
Kling AI Photo to Video: Two Modes
Standard Mode is faster and cheaper — useful only for quick prompt tests. Professional Mode unlocks camera movement controls and produces noticeably higher output quality.
For any clip you plan to publish, Professional Mode is the right call. The credit difference is small compared to the quality gap it closes.
- Kling AI photo to video — locks your visual identity. Use it for brand content, products, portraits, or any asset where the look must be preserved.
- Text-to-video — generates from scratch. Use it when exploring concepts without a reference asset.
- For content creators and marketers, image-to-video almost always produces more usable, on-brand output.
We verified these capabilities against the official Kling AI documentation. For a full comparison of Kling AI photo to video against competing tools, see our AI video tools breakdown.
Prepare Your Photo for the Best Results
The source image is the variable most Kling AI photo to video tutorials skip — and it decides everything about your output.
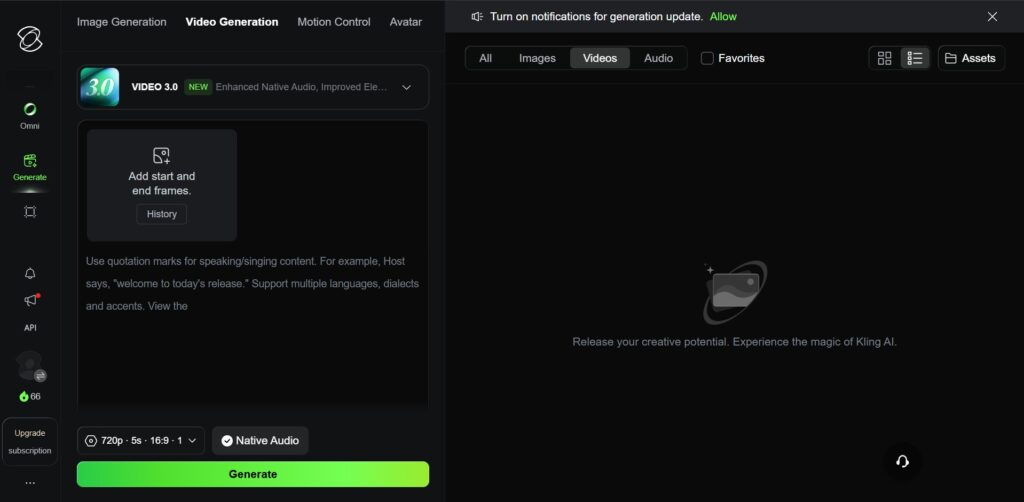
We ran identical prompts across five image quality levels. The same prompt that produced a cinematic clip with a clean, high-res photo produced background warping on a compressed social download.
Same tool. Same prompt. Completely different results. Fix the source image first — then prompt.
Kling AI photo to video — upload checklist
- Resolution: Aim for at least 720×720px. Higher resolution gives Kling more detail and reduces edge artifacts on moving elements.
- Clean background: Busy or cluttered backgrounds animate unpredictably. A clear, simple background keeps all motion attention on your subject.
- Directional lighting: Flat, even lighting produces flat video. Side lighting or visible shadows generate natural depth during animation.
- Subject fills the frame: Center the subject with breathing room on each side. Cut-off subjects or extreme close-ups confuse the model's edge detection.
- No text overlays: Logos, captions, or watermarks on the source image distort badly when animated. Remove them before uploading.
What Photos Work Best for Kling AI Photo to Video
For Kling AI photo to video, product shots on plain or gradient backgrounds work exceptionally well. Portraits perform best with clear facial lighting and no obstructions.
Landscapes generate stunning atmospheric motion — clouds shift, foliage sways, water flows naturally.
One practical habit: run a quick test on Standard Mode before committing to Professional Mode. If the Standard output already shows warping, the issue is the source image — not the prompt.
Fix the photo first — then run your Kling AI photo to video clip again. See our AI image tools guide to clean up source images before uploading.
Step-by-Step Kling AI Photo to Video: From Upload to Movie Scene
The full Kling AI photo to video workflow — from uploading a still to downloading a cinematic clip — takes five to fifteen minutes. Here's the exact sequence, nothing skipped.
-
1
Create your Kling AI account
Head to kling.ai and sign up — free, no credit card required. The free tier gives 66 daily credits at 720p (watermarked). Enough for solid testing before any paid commitment.
-
2
Select Kling AI Photo to Video — set Professional Mode
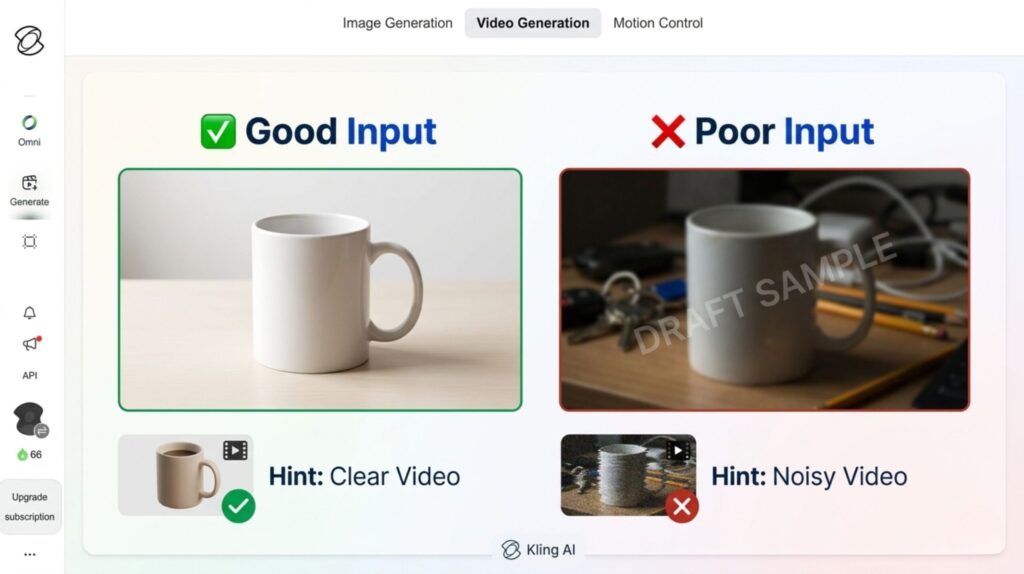
From the dashboard, open the Image to Video tab. Switch the mode selector to Professional. This unlocks camera movement controls. Standard Mode is fine for quick tests, nothing more.
-
3
Upload your photo and write your motion prompt
Upload your prepared image. In the prompt field, describe only what moves — not what's already visible. The model can see your photo. Your job is directing the motion and camera, not redescribing the scene.
-
4
Set duration, aspect ratio, and negative prompts
Choose 5 or 10 seconds. Set the aspect ratio for your platform — 9:16 for Reels and Shorts, 16:9 for YouTube. Always add negative prompts before generating.
-
5
Generate, review, and iterate
Click Generate and wait 2–15 minutes. If the Kling AI photo to video output is too aggressive, lower the intensity slider and regenerate. Most prompts need one or two passes to land cleanly.
- Test your prompt on Kling 2.6 first to confirm the motion direction is correct and stable.
- Once it works, switch to Kling 3.0 for the final high-quality output.
- Batching three to five clips this way is faster and significantly cheaper per usable result.
Credits to @PiXimperfect
Camera Moves and Prompts for Kling AI Photo to Video
This is the step most tutorials rush. Kling AI photo to video reads filmmaking vocabulary — write prompts like a director, and you get results like a director.
Generic instructions like "camera moves forward" produce murky output. Specific cinematic terms produce clean, controlled motion.
Here are the six camera moves worth learning for Kling AI photo to video, with the exact prompt language that works in Professional Mode.
| Move | What it does | Best for | Prompt to use |
|---|---|---|---|
| Dolly in | Camera physically moves toward the subject | Product reveals, emotional close-ups | slow cinematic dolly in toward the subject |
| Pan right | Camera rotates horizontally on a fixed axis | Landscape reveals, scene-setting shots | camera pans slowly right, revealing the scene |
| Tilt up | Camera rotates upward from a pivot point | Scale reveals, dramatic architecture | camera tilts up from ground level to full height |
| Tracking shot | Camera moves alongside the subject | Fashion, walking shots, action | smooth tracking shot following subject from left |
| Orbital arc | Camera circles around the subject | Product 360° views, hero shots | slow 30-degree orbit around subject |
| Crane up | Camera rises vertically while panning | Establishing shots, landscape reveals | crane up while panning left to reveal full scene |
The one rule that prevents failed Kling AI photo to video generations
Never combine two conflicting camera movements in a single Kling AI photo to video prompt. Kling averages them — the result is blurry, warped output that looks nothing like either instruction.
"Pan left and pan right simultaneously" will break every time. Generate each shot separately, then cut between them in any basic editor. One shot. One movement. One mood.
- Subject + action: "The product rotates slowly on its axis"
- Environment: "soft rim lighting, clean white surface"
- Camera direction: "slow dolly in toward the label"
- Negative prompts: "no warping edges, no jittery motion, no background distortion"
Frequently Asked Questions — Kling AI Photo to Video
What is Kling AI photo to video and how does it work?
+Kling AI photo to video animates a still image into a video clip while preserving your original composition, lighting, and subject. The AI only adds motion — it doesn't reinvent the scene.
It interprets depth and physical space inside your image, then generates movement that follows real-world physics. The result looks like a camera was actually rolling rather than a tool inventing footage from scratch.
Is Kling AI free to use for photo-to-video generation?
+Yes. The free plan gives 66 daily credits — enough for several 5-second test clips per day at 720p (watermarked). No credit card required.
Paid plans start around $6.99/month. They unlock 1080p output, more monthly credits, and access to Kling 3.0 features — including 4K output and multi-shot generation from a single image.
What type of photos work best with Kling AI?
+High-resolution photos with clear subjects, directional lighting, and clean backgrounds consistently produce the best output. Product photos on plain surfaces are ideal. Portraits work well when the face is clearly lit.
Always use the original file export — never a compressed social media download. You can try Kling AI free with a couple of test photos to see how your specific content type performs before any commitment.
How do I make Kling AI videos look more cinematic?
+Three things matter most. First, always use Professional Mode — it's the only mode that exposes camera movement controls. Second, use specific filmmaking terms in your prompt: "slow dolly in," "tracking shot from left," "crane up while panning."
Third, add negative prompts to every generation: "no warping, no jittery motion, no background distortion." This one habit removes the most common artifacts and produces noticeably cleaner clips without extra regenerations.
What is the Motion Brush in Kling AI and when should I use it?
+Motion Brush lets you paint directional arrows directly onto your photo to specify exactly how individual elements should move. Instead of describing motion in text, you draw it on the image.
Use Motion Brush when text prompts produce motion in the wrong areas, or when you need precise control over a complex scene — for example, keeping the background still while a product or subject moves in a specific direction.
Can I use Kling AI for product marketing and social media content?
+Absolutely — and it's one of Kling's most practical use cases. A product photo animated with a slow orbital or dolly move becomes an Instagram Reel, TikTok hook, or YouTube Shorts intro with no filming required.
Kling 3.0's multi-shot feature generates up to six connected shots from one reference image with consistent visual identity throughout. See our AI video tools comparison for a full breakdown of how Kling compares to alternatives for social and marketing content.
How long does Kling AI take to generate a video from a photo?
+Typically 2 to 15 minutes, depending on clip length, the model selected, and server load. A 5-second Kling 2.6 clip generates faster than a 10-second Kling 3.0 Professional Mode clip.
For batching content, the workflow is efficient: submit one generation, prep the next prompt while it runs, and review output without any dead time between clips. Most creators process three to five clips per session comfortably.
What are negative prompts and why do they matter in Kling AI?
+Negative prompts tell Kling what not to generate. They're the fastest way to clean up output quality without changing your core prompt.
Use these on every Kling AI photo-to-video generation: "no face morphing, no extra limbs, no jittery motion, no background warping, no blurry transitions." Adding this single line takes five seconds and consistently produces more stable, professional-looking clips.
🎬 Build the Rest of Your AI Video Workflow
You've got the Kling AI photo-to-video workflow. Now build the system around it — from choosing the right tools to creating complete AI-powered content pipelines: