Mirko
AI Tech Writer
I've spent enough hours scrubbing through raw footage that I built my whole workflow around one shortcut: edit YouTube videos in Descript by editing the transcript, not the timeline. Delete a sentence, and the matching clip disappears with it — no scrubbing, no guesswork. This tutorial walks through the exact process I use, step by step, so even a first-time editor can follow along.
Some links are affiliate links · they support this site at no extra cost to you · Full disclosure
1. What You'll Learn in This Tutorial
What You'll Learn in This Descript Tutorial
You finish recording a YouTube video, open your editing software, and suddenly you're stuck scrubbing through a timeline for hours — cutting clips, syncing audio, adding captions by hand. What should take 30 minutes turns into an entire afternoon.
That's exactly why I switched to Descript, and why more creators are doing the same. Instead of learning complex editing controls, you edit YouTube videos in Descript by editing text — delete a word from the transcript, and it disappears from the video. This tutorial walks through the exact workflow.
Here's the reality: traditional editors weren't built for talking-head content, tutorials, or vlogs — they were designed for film production. Most YouTube creators don't need cinematic color grading. They need speed, clean audio, and fast publishing.
According to Wyzowl's 2026 State of Video Marketing report, 91% of businesses now use video as a marketing tool — and the creators who publish consistently are the ones who've figured out how to edit faster, not better.
Most video editing software was built for film production — not for someone talking straight into a webcam.
That's what this tutorial is about. I'm not covering every Descript feature here — my full Descript AI Review already does that. Instead, this is the exact 8-step workflow I use to go from raw footage to a published YouTube video, as fast as possible.
💡 TL;DR — What You'll Learn
This tutorial is for YouTubers who want to cut editing time using Descript's text-based workflow. It covers importing footage, removing filler words, cleaning audio, adding captions, creating chapters, and publishing directly to YouTube.
Quick answer: if you create talking-head videos, tutorials, podcasts, or vlogs, Descript can replace most of your editing stack. Keep reading for the step-by-step breakdown.
📌 Coming Up in This Tutorial
- How to import footage and set up your project
- The text-based editing workflow (delete words = delete video)
- One-click filler word removal and audio cleanup
- Adding captions, chapters, and publishing to YouTube
- Which Descript plan is right for your channel
Short on time? Jump straight to the first step →
Step 1 — Import Your YouTube Footage into Descript
Before you can edit YouTube videos in Descript, you need to get your footage into the app — and that part takes less than two minutes once you know which of the three import methods actually fits how you work.
Most creators already have footage sitting on a hard drive. Others prefer recording straight inside Descript, which skips a step entirely. And if you're repurposing older content, Descript can pull a video directly from a YouTube URL. Here's how each one works, and when I'd reach for it.
Method 1: Drag and Drop (Fastest for Local Footage)
This is the method most creators reach for daily. If you've already recorded on a camera, phone, or screen recorder, here's the process:
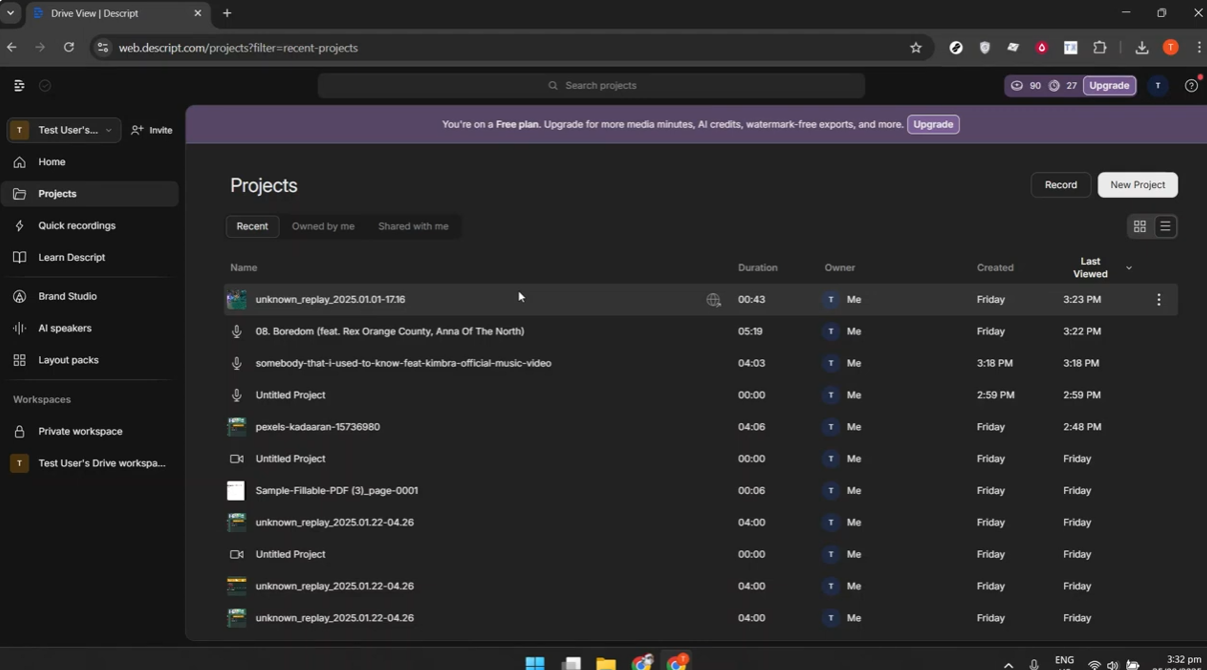
- Open Descript and click New Project
- Select Video Project
- Name the project — using the video title keeps things easy to find later
- Drag your video file directly into the workspace
Descript transcribes the footage as it uploads. Depending on length, that typically takes 30 seconds to a few minutes — once it's done, the full transcript appears on the left side, ready to edit.
Pro tip: Descript works best with MP4 and MOV files. Other formats still work, but conversion happens in the background first, which adds time before you can start editing.
Method 2: Record Directly in Descript
If you haven't filmed yet, you can skip external recording tools entirely — Descript has a built-in recorder for webcam, microphone, and screen capture, all in one place.
Here's why that matters: when you record inside Descript, transcription happens in real time. By the time you stop recording, the transcript is already sitting there waiting for you.
- Open a new project
- Click Record in the toolbar
- Select your camera, microphone, and — optionally — your screen
- Hit record and start talking
This method works well for tutorials, talking-head videos, and quick updates where setting up a full camera rig isn't worth the time.
Method 3: Import Directly from a YouTube URL
This one surprises a lot of creators — paste a YouTube link into Descript, and it pulls the video automatically, transcript included.
A few reasons this is worth knowing: repurposing an old video into Shorts or a compilation, adding captions to something you published without them, or pulling a clean transcript for a blog post or show notes.
- Click File → Import → YouTube
- Paste the video URL
- Wait for Descript to download and transcribe it
One thing worth being direct about: you can only import videos you own or have permission to use. Descript respects copyright — and that's worth respecting too.
| Method | Speed | Best For |
|---|---|---|
| Drag & Drop | ⚡ Fastest | Pre-recorded footage |
| Record in Descript | ⚡ Fast (real-time) | Tutorials & talking-head |
| YouTube URL Import | 🕐 Moderate | Repurposing & captioning |
💾 One detail worth flagging: checking Descript's current pricing page while updating this guide, file-size ceilings scale by plan — Free caps single uploads at 1GB, Hobbyist and Creator raise that to 10GB and 20GB, and Business goes up to 50GB. If you're importing raw 4K footage straight off a modern mirrorless camera, that free-tier 1GB ceiling can get hit faster than you'd expect.
What Happens After Import
Once your footage lands in Descript, something unfamiliar shows up on screen — but it's exactly what makes the rest of this workflow possible.
The transcript becomes your timeline. Delete a word, and Descript deletes that slice of video along with it.
Every word you spoke appears as editable text on the left, with the video preview on the right. This is the core idea behind text-based editing, and it's what separates Descript from a traditional timeline editor like Premiere or Final Cut — you're not hunting for an exact frame or scrubbing through a waveform. You read, select, and delete.
According to Descript's own documentation, this approach cuts editing time by up to 50% for most creators — especially anyone working with dialogue-heavy footage like interviews or talking-head tutorials.
If you're brand new to Descript and want the fuller picture before diving into this workflow, my Descript AI Review covers the complete feature set, pricing tiers, and how it stacks up against alternatives.
💡 Quick tip: name your projects consistently — something like "VideoTitle_Date" (e.g., "DescriptTutorial_Aug2026"). Once you've got 50+ projects sitting in Descript, this small habit saves real time searching later.
Step 2 — Edit Your Video Using Text-Based Editing
This is the step that changes everything. Once you understand how text-based editing works, you won't want to go back to scrubbing through timelines frame by frame — this is the part of Descript that actually lets you edit YouTube videos faster, not just differently.
Here's the concept: Descript treats your video like a document. Every word you said appears as text. Delete a sentence from the transcript, and it disappears from the video. Rearrange paragraphs, and the video rearranges with them.
You can edit YouTube videos in Descript the same way you'd edit a Google Doc — no waveforms, no razor tools, just words.
How Text-Based Editing Actually Works
Say you recorded a 10-minute tutorial but rambled for 30 seconds in the middle. In a traditional editor, you'd have to:
- Find the exact start point on the timeline
- Find the exact end point
- Make the cut without clipping audio
- Adjust transitions to avoid jump cuts
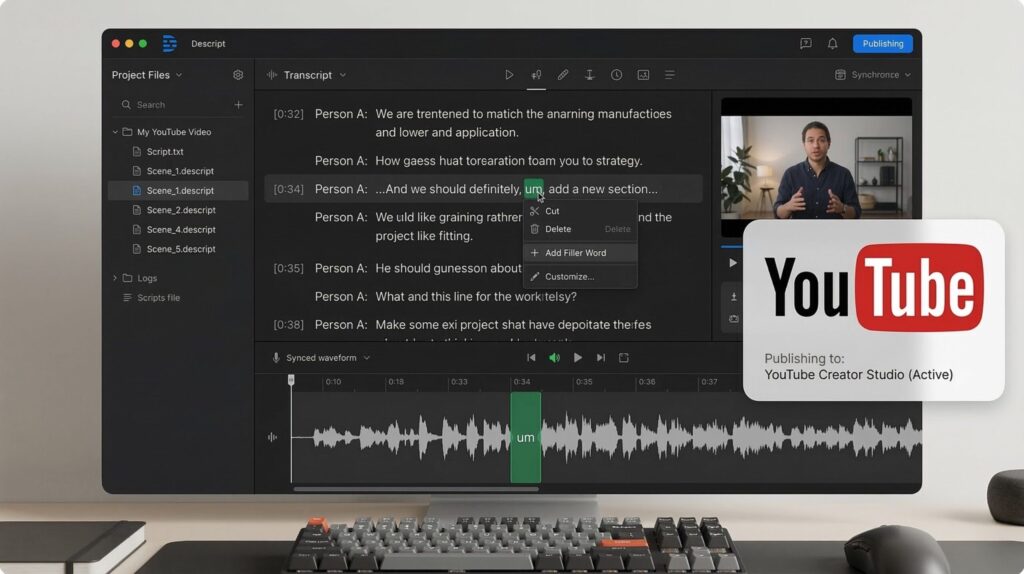
In Descript, you highlight those sentences in the transcript and press Delete. Done. The video updates instantly, the audio stays synced, and if you change your mind, Ctrl/Cmd + Z undoes it — just like in any text editor.
The time savings compound the more you use this workflow. Most creators who switch describe cutting a rough-cut pass down from a couple of hours to well under one — the exact gain depends on how dialogue-heavy your footage is.
The Core Editing Actions
Everything you already know about editing text applies here:
- Select text — click and drag to highlight any part of the transcript
- Delete — removes the audio/video for that section
- Cut — removes and copies to your clipboard, so you can paste it elsewhere
- Copy — duplicates without removing the original
- Paste — inserts the copied section wherever your cursor is
You can also rearrange entire sections by dragging highlighted text to a new spot — Descript moves the matching video automatically.
| Action | Shortcut | What It Does |
|---|---|---|
| Delete | Backspace or Delete | Removes selected audio/video permanently |
| Cut | Ctrl/Cmd + X | Removes and copies to clipboard |
| Copy | Ctrl/Cmd + C | Copies without removing original |
| Paste | Ctrl/Cmd + V | Inserts copied content at cursor |
| Undo | Ctrl/Cmd + Z | Reverses last action |
| Select All | Ctrl/Cmd + A | Highlights entire transcript |
Delete vs. Ignore — Know the Difference
Descript gives you two options when you remove content. Delete removes the section completely — gone from the transcript and the video. Use it for mistakes, tangents, or anything you'll never need again.
Ignore hides the section but keeps it recoverable — the text shows struck through, and the video skips over it, but you can restore it anytime. Reach for Ignore when:
- You're not sure yet if a section adds value
- You might want an alternate cut later
- You're collaborating with someone who should see the original
For most solo YouTube editing, Delete is faster. If you're producing both a long-form and a short-form cut of the same video, Ignore keeps that flexibility open.
Using Playback to Speed Up Review
Here's a trick that saves real time: review at faster-than-normal playback. Bump it to 1.5x or 2x, and you'll catch mistakes, spot awkward pauses, and flag cuts to make — in a fraction of the time.
- Click the playback speed button below the video preview
- Select 1.25x, 1.5x, or 2x
- Watch, pause, and edit as you go
Most creators land on 1.5x as the sweet spot — fast enough to save time, slow enough to still catch details.
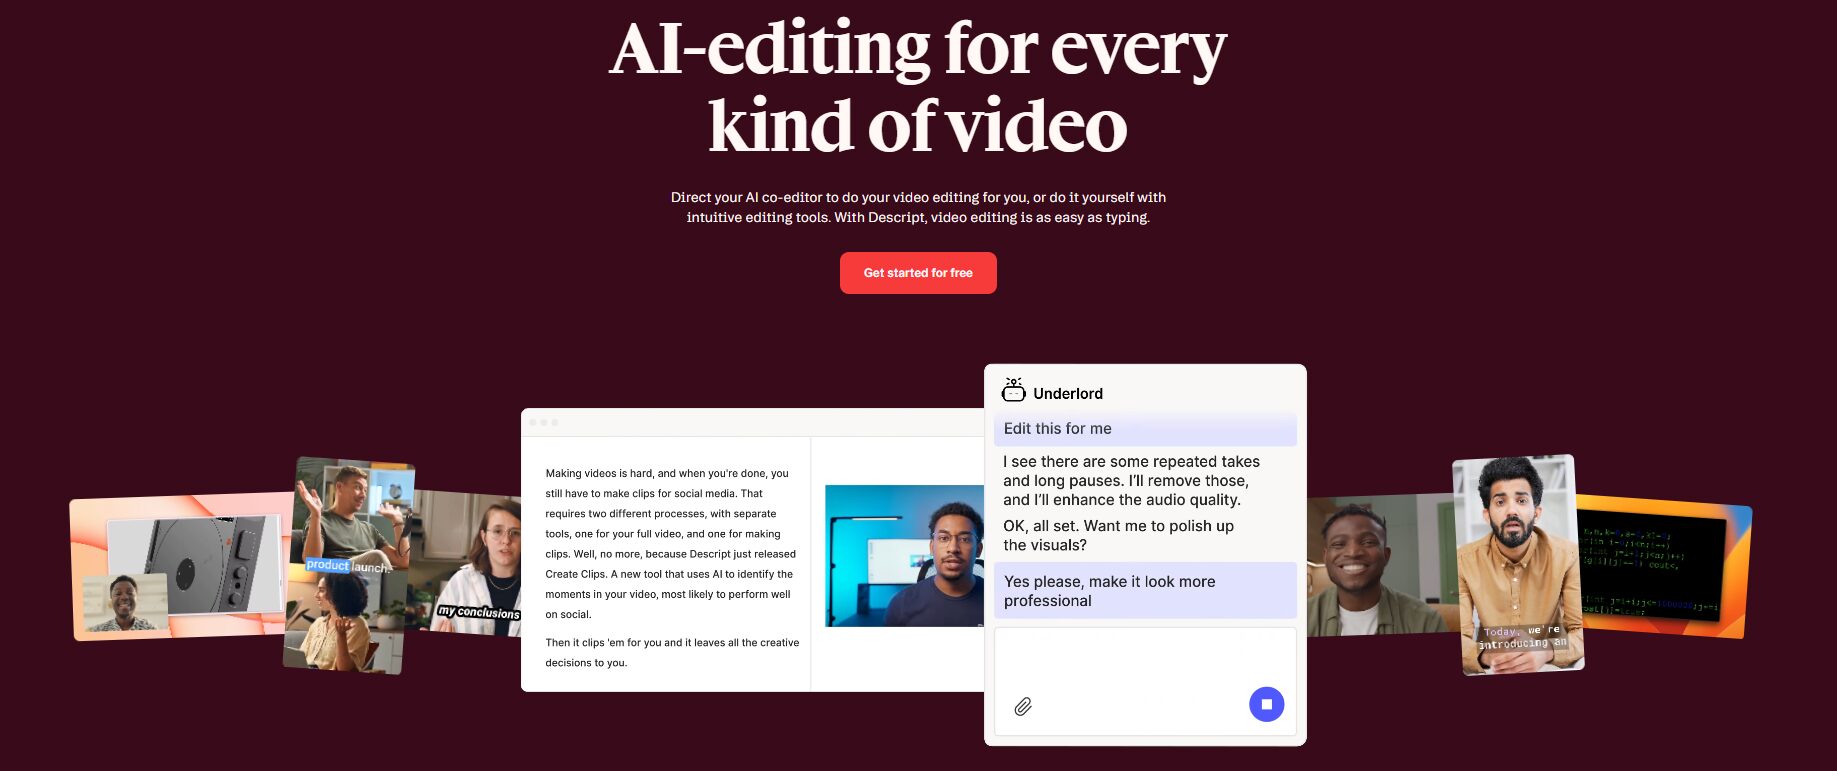
🎯 Pro tip: if you recorded multiple takes of the same line, Descript's Underlord AI can find and delete the duplicates for you. Click Underlord → Remove Retakes and let it clean up your timeline.
Handling Transcription Errors
Descript's transcription accuracy is genuinely good — up to 95% with clear audio, per Descript's own help documentation, dropping somewhat with background noise, heavy accents, or unusual technical terms.
Here's how to fix errors, using Descript's current correction workflow:
- Double-click the incorrect word (or the word next to it) to select it
- Click Correct in the hover toolbar, or press C — choose Correct All if the same error repeats throughout the transcript
- Type the right word
For fixing several words in a row, Opt+C (Mac) or Alt+C (Windows) opens Correct mode, so you can click and retype word after word without repeating the click-Correct step each time.
This only changes what Descript displays and searches — your actual voice recording stays untouched. If transcription accuracy trips you up regularly, my guide on why AI meeting notes go wrong (and how to fix them) covers the same root causes, which apply to video transcription too.
When to Use the Timeline (And When to Skip It)
Text-based editing handles most of your work, but Descript also has a traditional timeline below the transcript — and knowing when to reach for it matters.
Use the timeline for:
- Fine-tuning pauses between words
- Placing B-roll precisely
- Layering background music
- Syncing visuals to specific moments
Skip the timeline for:
- Removing mistakes or tangents
- Rearranging sections
- Basic trimming and cutting
The workflow that works: do rough cuts in the transcript, then switch to the timeline only for polish. Fast where speed matters, precise where precision matters.
🎬 Traditional Timeline Editing
- Scrub through waveforms
- Find exact cut points manually
- Risk audio/video desync
- Steeper learning curve
✅ Descript Text-Based Editing
- Read and highlight to select
- Delete text = delete video
- Always stays synced
- Works like a document
At this point, your footage is imported and your primary cuts are made straight from the transcript. This is where you start to see why creators edit YouTube videos in Descript — the video's tighter, the rambling's gone, and the shape of the final cut is already emerging. Next: cleaning up even faster with one-click filler word removal.
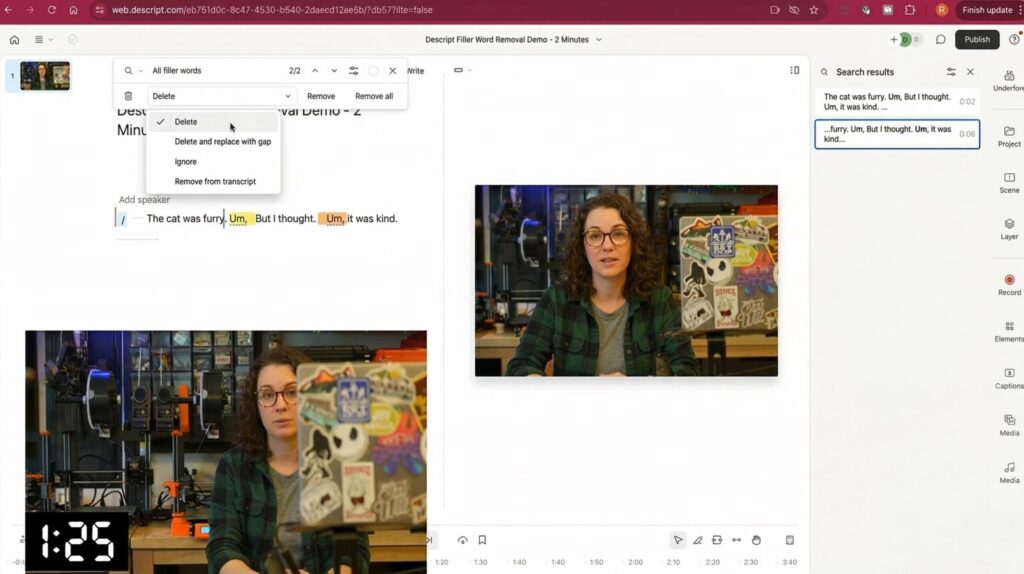
4. Step 3 — Remove Filler Words Automatically
“Um.” “Uh.” “Like.” “You know.” “Basically.”
We all say them. And manually cutting each one from a 15-minute video? That’s easily 30 minutes of tedious work.
Descript removes them in one click.
How It Works
- Click Underlord in the toolbar (or press Cmd/Ctrl + J)
- Select Remove filler words
- Choose which fillers to remove (or select all)
- Click Apply
That’s it. Descript scans the entire transcript, identifies every filler word, and deletes them from both the text and the video. What used to take half an hour now takes five seconds.
Which Filler Words Does Descript Detect?
Descript catches the most common offenders:
- “Um” and “uh”
- “Like” (when used as filler, not comparison)
- “You know”
- “Kind of” / “Sort of”
- “Basically”
- “Actually”
- “I mean”
We can customize which ones to remove. If our speaking style uses “like” intentionally, we uncheck it. If we want everything gone, we select all.
| Filler Word | Remove? | Why |
|---|---|---|
| "Um" / "Uh" | ✅ Always | Never adds value |
| "You know" | ✅ Always | Sounds unprepared |
| "Like" | ⚠️ Usually | Keep if intentional emphasis |
| "Basically" | ✅ Yes | Often redundant |
| "I mean" | ⚠️ Context | Sometimes adds natural flow |
Should We Remove Every Filler?
Not always. Here’s the nuance most tutorials skip:
Remove all fillers when:
- Creating polished tutorials or educational content
- Recording ads, intros, or branded content
- We want to sound confident and authoritative
Keep some fillers when:
- Recording casual vlogs or conversational content
- Natural speech matters more than polish
- Over-editing makes us sound robotic
A video with zero fillers can feel too clean — almost AI-generated. For YouTube specifically, a small amount of natural speech keeps viewers engaged. The key is removing the distracting ones while keeping the rhythm.
When we edit YouTube videos in Descript regularly, we develop a sense for this balance. Start by removing everything, then listen back. If it sounds unnatural, undo and be more selective.
⚡ Speed Tip
Run filler removal before detailed editing. Removing fillers first tightens the transcript, making it easier to spot other cuts. Think of it as clearing the noise before the real work begins.
What About Awkward Pauses?
Filler word removal handles the “ums” — but what about those three-second pauses where we lost our train of thought?
Descript has a separate feature: Shorten Word Gaps.
- Click Underlord → Shorten word gaps
- Set the maximum gap length (we recommend 0.5–0.8 seconds)
- Apply
This compresses silences without cutting actual words. Combined with filler removal, it makes our pacing tighter and more professional.
According to YouTube’s Creator Academy, pacing directly impacts retention. Videos that move briskly keep viewers watching longer — which signals the algorithm to recommend our content.
❌ Before
"So, um, today we're going to, you know, basically talk about, uh, how to edit videos... like, faster."
✅ After
"So today we're going to talk about how to edit videos faster."
Our video is now tighter — no rambling, no “ums,” no awkward pauses. But we might still have background noise, room echo, or inconsistent audio levels. That’s what the next step fixes with one toggle: Studio Sound.
5. Step 4 — Clean Your Audio with Studio Sound
Bad audio kills videos faster than bad lighting. Viewers will tolerate a grainy image — but background hum, room echo, or muffled voice? They click away. That’s why Descript for YouTubers includes Studio Sound.
Studio Sound fixes audio problems in one click. It uses AI to remove background noise, reduce echo, and enhance vocal clarity — even if we recorded on a laptop mic in a noisy room.
How to Apply Studio Sound
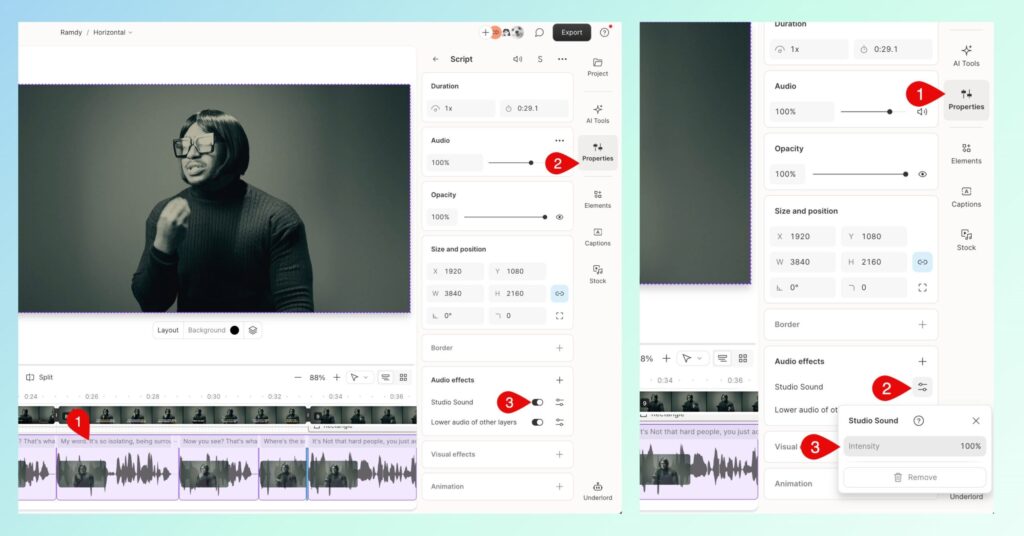
- Select the audio track in our project (click the script layer)
- Open the Properties panel on the right sidebar
- Find Audio Effects and toggle on Studio Sound
- Adjust the Intensity slider (more on this below)
Descript processes the entire file. Depending on length, this takes anywhere from 30 seconds to a few minutes. Once complete, the difference is immediate.
The Intensity Setting — Finding the Sweet Spot
Studio Sound isn’t all-or-nothing. The intensity slider controls how aggressively Descript processes our audio:
- 0% — No effect (original audio)
- 30-60% — Natural enhancement (recommended for most creators)
- 100% — Maximum processing
Here’s the catch: higher isn’t always better.
At 100%, voices can sound slightly robotic or over-processed. The AI removes so much that it strips some natural warmth. For YouTube content where authenticity matters, this can feel off-putting.
We recommend starting at 50%, listening back, then adjusting. Most creators land somewhere between 40-60% for the best balance of clarity and natural tone.
| Intensity | Best For | Watch Out |
|---|---|---|
| 20-40% | Already decent audio, light cleanup | May not fix noisy recordings |
| 40-60% | Most YouTube creators (recommended) | — |
| 70-100% | Very noisy environments | Can sound over-processed |
What Studio Sound Actually Fixes
Studio Sound isn’t just a noise gate. It uses AI to isolate and regenerate voice separately from background sounds. This means it can fix issues that traditional tools can’t:
- Background noise — Air conditioning, fans, street sounds
- Room echo — That hollow sound from untreated spaces
- Inconsistent levels — When we move closer/farther from the mic
- Muffled audio — Low-quality microphones or phone recordings
The technology works by analyzing our voice pattern, then reconstructing it cleanly while suppressing everything else. According to Descript’s documentation, this approach delivers better results than standard noise reduction because it doesn’t just cut frequencies — it intelligently separates voice from noise.
When NOT to Use Studio Sound
Studio Sound is powerful, but it’s not always the right choice:
Skip it when:
- Our original audio is already clean (professional mic + treated room)
- We want raw, unprocessed sound for authenticity
- The audio includes music or sound effects we want to preserve
Always use it when:
- We recorded in a noisy environment
- We hear echo or room reverb
- The audio sounds “thin” or distant
If we’re unsure, apply it at 30% and compare. We can always remove it if the original sounds better.
🎧 Pro Tip
Use headphones when adjusting intensity. Laptop speakers hide audio problems that viewers will hear. Always preview with headphones or studio monitors to catch issues before publishing.
Studio Sound + Filler Removal = Professional Audio
Here’s the workflow that makes the biggest difference when we edit YouTube videos in Descript:
- Remove filler words first (Step 3)
- Apply Studio Sound second (this step)
- Review at 1.5x playback to catch any remaining issues
This order matters. Filler removal shortens the audio, so we’re not processing unnecessary content. Then Studio Sound cleans what remains. The result is tight, polished audio that sounds like we recorded in a professional studio — and it’s a key reason creators edit YouTube videos in Descript instead of juggling multiple apps.
For creators who want even more control over audio, our Descript AI Review covers additional audio features like multitrack editing and manual noise reduction.
🔊 What Studio Sound Fixes
- Background hum from AC
- Room echo / reverb
- Muffled, distant voice
- Inconsistent volume
- Clean, quiet background
- Dry, focused sound
- Clear, present voice
- Balanced levels
With clean audio locked in, our video already sounds professional. But YouTube rewards accessibility — and that means captions. In the next step, we’ll add subtitles automatically using the transcript we already have.
6. Step 5 — Add Captions and Subtitles for YouTube
Here’s a stat that should change how we think about captions: 85% of Facebook videos are watched without sound. On YouTube, the number is lower — but still significant, especially on mobile.
Captions aren’t optional anymore. They’re expected.
The good news? When we edit YouTube videos in Descript, captions are almost free. The transcript we’ve been editing is our caption file. We just need to style it and export.
Why Captions Matter for YouTube
Beyond accessibility (which matters on its own), captions directly impact performance:
- Watch time increases — Viewers follow along even in noisy environments
- SEO improves — YouTube indexes caption text for search
- Retention goes up — Readers who can’t hear still engage
- Global reach expands — Non-native speakers understand more easily
According to YouTube’s Creator Academy, videos with accurate captions consistently outperform those without. The algorithm notices when viewers watch longer — and captions help make that happen.
How to Add Captions in Descript
Since our transcript already exists, adding captions takes three clicks:
- Click Captions in the right sidebar
- Choose a caption style from the presets
- Adjust placement and appearance as needed
That’s it. Descript overlays the captions on our video, synced perfectly to the audio. No manual timing. No third-party tools.
Choosing a Caption Style
Descript offers several preset styles — from minimal subtitles to bold, animated captions (the kind we see on TikTok and Reels). The right choice depends on our content:
| Style | Look | Best For |
|---|---|---|
| Minimal | Simple white text, subtle background | Professional / Educational |
| Bold / Animated | Large text, word-by-word highlight | Shorts / Reels / TikTok |
| Boxed | Text with solid background box | YouTube Long-Form |
| Karaoke | Words highlight as spoken | High-Energy Content |
Customizing Captions
Default styles work well, but we can fine-tune everything:
- Font — Match our brand typography
- Size — Larger for mobile viewers
- Color — White with black outline works universally
- Position — Bottom center (standard) or top for specific shots
- Background — Semi-transparent box improves readability
One tip: don’t go too fancy. Captions should be readable, not distracting. If viewers notice the style more than the content, we’ve overdone it.
Exporting Captions as SRT
If we prefer uploading captions separately to YouTube (rather than burning them into the video), Descript exports standard SRT files:
- Click File → Export
- Select Subtitles/Captions
- Choose SRT format
- Save the file
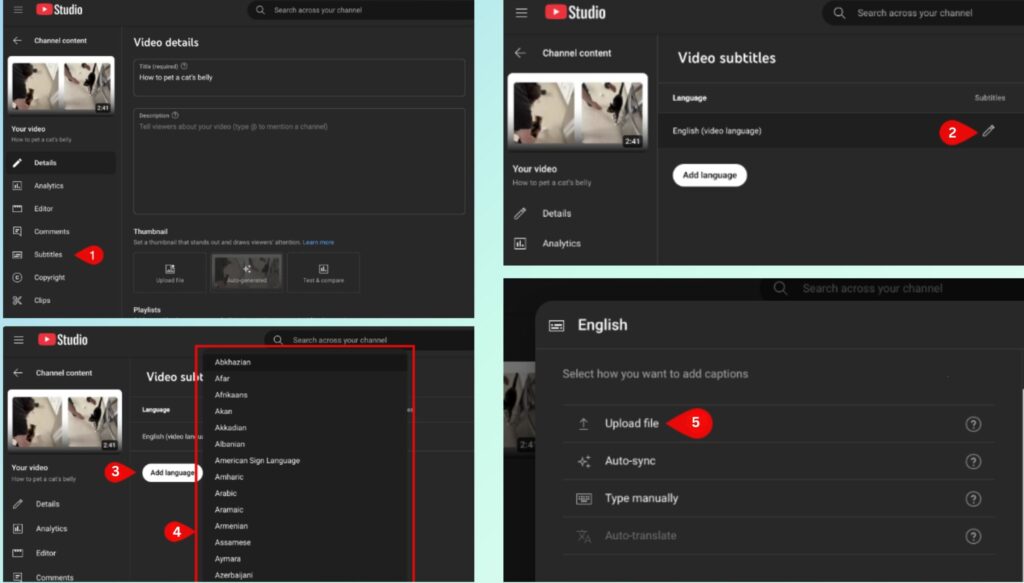
Then in YouTube Studio, we upload the SRT under Subtitles → Add Language → Upload File. This gives YouTube the text for SEO while letting viewers toggle captions on/off.
🔥 Burned-In Captions
- Always visible (can't be turned off)
- Works on any platform
- Great for Shorts/Reels repurposing
- Style is locked after export
📄 SRT File Upload
- Viewer can toggle on/off
- YouTube indexes for SEO
- Editable after upload
- Supports multiple languages
Fixing Caption Errors
Remember those transcription corrections we made earlier? They carry over to captions automatically. But if we spot errors now, we can still fix them:
- Click the incorrect word in the transcript
- Correct the spelling or phrasing
- The caption updates instantly
This is why editing the transcript carefully in Step 2 pays off — accurate captions without extra work.
For videos with technical terms, names, or industry jargon, spending two minutes on corrections prevents embarrassing caption errors that viewers will notice.
💡 Quick Tip
Export both versions. Burn captions into the video for social repurposing, then also export an SRT for the main YouTube upload. This gives us maximum flexibility without re-editing.
Captions for Shorts and Repurposing
Planning to turn this video into YouTube Shorts, Instagram Reels, or TikTok clips?
Burned-in captions are essential for short-form. Unlike YouTube, these platforms don’t have reliable caption toggles — and most viewers watch with sound off.
The bold, animated caption styles in Descript are designed exactly for this. Large text, word-by-word highlighting, high contrast. They grab attention in a scroll-heavy feed.
If we’re creating both long-form and short-form content, check our Descript vs CapCut comparison to see how each tool handles the repurposing workflow differently.
Our video now has polished audio and professional captions. But there’s one more thing YouTube rewards: chapters. In the next step, we’ll let Descript’s AI create chapter markers automatically — saving us from manually writing timestamps.
7. Step 6 — Create YouTube Chapters with Underlord AI
Chapters make long videos watchable. They let viewers jump to exactly what they need — and YouTube rewards that behavior with better retention metrics.
But manually writing timestamps? Tedious. Watching our own video to note when topics change? Time we don’t have.
Descript’s Underlord AI handles this automatically. It analyzes our content, identifies topic shifts, and generates chapter markers — complete with titles and timestamps.
Why Chapters Matter for YouTube
Chapters aren’t just convenient. They directly impact how YouTube treats our video:
- Higher retention — Viewers skip to relevant sections instead of leaving
- Better search visibility — Chapter titles appear in Google search results
- Improved click-through — Timestamps show in video previews
- Algorithm signals — YouTube sees structured content as higher quality
According to Google’s Search Central documentation, videos with proper chapter markup can appear as rich results — showing individual sections directly in search.
When we edit YouTube videos in Descript, adding chapters takes seconds. No reason to skip this step.
How to Create Chapters with Underlord
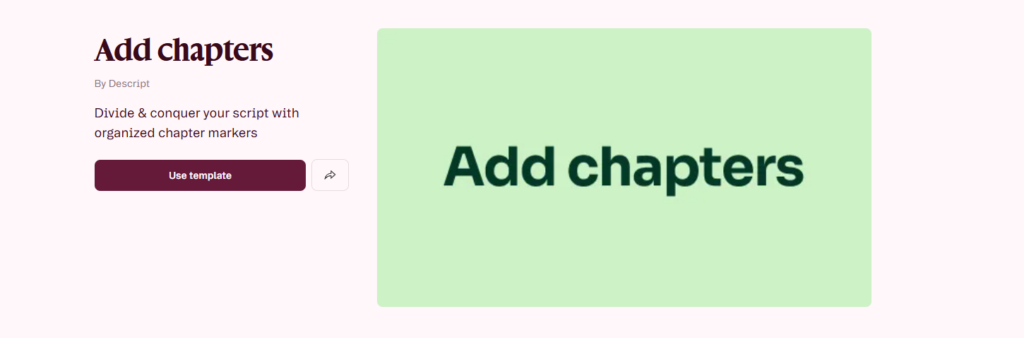
- Click Underlord in the toolbar (or press Cmd/Ctrl + J)
- Select Create chapters
- Choose the number of chapters (or let AI decide)
- Review and adjust the generated titles
- Click Apply
Underlord scans the transcript, identifies natural topic breaks, and creates markers. The results are surprisingly accurate — though we should always review before publishing.
| Video Length | Recommended Chapters | Why |
|---|---|---|
| Under 5 min | 2-3 | Too many feels fragmented |
| 5-15 min | 4-6 | Sweet spot for tutorials |
| 15-30 min | 6-10 | Helps navigation without overwhelm |
| Over 30 min | 8-15 | Essential for long-form retention |
Editing Chapter Titles
AI-generated titles work — but human-written titles perform better. After Underlord creates chapters, we should refine them:
Good chapter titles are:
- Specific (not “Introduction” — instead “Why This Method Works”)
- Searchable (include keywords viewers might search)
- Concise (under 50 characters)
- Action-oriented (start with verbs when possible)
For example, if Underlord generates “Audio Settings,” we might change it to “Fix Bad Audio in One Click.” Same content, more compelling.
📝 Better Chapter Titles
How Chapters Appear on YouTube
Once we publish with chapters, YouTube displays them in three places:
- Progress bar — Visual markers viewers can hover over
- Description — Clickable timestamps at the top
- Search results — Individual chapters may appear as separate results
For chapters to work, YouTube requires:
- First chapter must start at 0:00
- Minimum of 3 chapters
- Each chapter at least 10 seconds long
Descript formats everything correctly when we export. No manual timestamp formatting needed.
Exporting Chapters with Our Video
When we publish directly to YouTube from Descript (covered in Step 8), chapters export automatically in the description.
If we’re exporting manually, we can copy chapter timestamps:
- Click File → Export
- In the export panel, check Include chapters in description
- Copy the generated timestamps
- Paste into YouTube’s description field
Either way, the work is done. Underlord identified the sections. We refined the titles. YouTube gets properly formatted chapters.
🎯 Pro Tip
Include keywords in chapter titles. If someone searches "how to remove background noise," and our chapter is titled "Remove Background Noise with Studio Sound" — that chapter can appear directly in search results. Free visibility.
When to Skip Chapters
Not every video needs chapters. Skip them when:
- Video is under 3 minutes (too short to navigate)
- Content is linear with no distinct sections
- We want viewers to watch start-to-finish (retention-focused)
For most tutorial and educational content — the kind where we edit YouTube videos in Descript regularly — chapters add value. Viewers expect them. YouTube rewards them.
For deep dives on how Underlord’s AI features work beyond chapters, our Descript AI Review covers the full suite including script generation, clip finding, and automated repurposing.
✅ Chapter Checklist Before Publishing
- First chapter starts at 0:00
- Minimum 3 chapters total
- Each chapter is at least 10 seconds
- Titles are specific and keyword-rich
- Timestamps are formatted correctly
Chapters are set. But what happens when we spot a mistake after recording — a mispronounced word, a wrong number, a verbal stumble we missed? That’s where Overdub comes in. In the next step, we’ll fix audio errors without re-recording a single thing.
8. Step 7 — Fix Mistakes Without Re-Recording (Overdub)
We’ve all had that moment. The video is edited, the audio is clean, captions are perfect — and then we notice it. A mispronounced word. A wrong statistic. A verbal stumble we somehow missed.
Normally, this means re-recording. Setting up the mic again. Matching the audio quality. Re-editing the new take.
Descript’s Overdub fixes this in seconds. It uses AI voice cloning to generate new audio that sounds like us — so we can correct mistakes by simply typing the right words.
What Overdub Actually Does
Overdub creates a digital clone of our voice. Once trained, it can speak any text we type — in our voice, with our tone and cadence.
For editing, this means:
- Fix mispronunciations — Type the correct word, Overdub speaks it
- Replace wrong information — Update numbers, names, or facts
- Smooth awkward phrasing — Rewrite sentences without re-recording
- Fill gaps — Add words we forgot to say
The result sounds natural enough that most viewers won’t notice the difference.
How to Set Up Overdub (First Time)
Before we can use Overdub, we need to train our voice model:
- Click Overdub in the sidebar
- Select Create voice
- Read the consent statement aloud (required for ethical reasons)
- Record the training script (about 10-15 minutes of speech)
- Wait for Descript to process (usually a few minutes)
Once trained, our voice model is saved. We only do this setup once — then Overdub is available in every project.
Note: Descript requires explicit consent before creating a voice clone. This protects against misuse and ensures we’re only cloning our own voice.
🎙️ First-Time Overdub Setup
Using Overdub to Fix Mistakes
Once our voice is set up, fixing errors is remarkably simple:
- Highlight the mistake in the transcript
- Type the correction — the new words we want spoken
- Click Regenerate (or press D)
- Descript generates new audio in our voice
- Review and accept — or regenerate if needed
The new audio replaces the mistake seamlessly. Video stays synced. No re-recording required.
This is where Descript transforms how we edit YouTube videos in Descript. A mistake that would’ve cost 30 minutes now takes 30 seconds.
Overdub shines for small corrections — a word here, a phrase there. It’s not designed to replace entire paragraphs.
| Scenario | Use Overdub? | Why |
|---|---|---|
| Wrong word or name | ✅ Perfect fit | Quick swap, sounds natural |
| Incorrect statistic | ✅ Ideal | Update numbers without re-recording |
| Smooth a stumble | ✅ Great | Replace awkward phrasing cleanly |
| Add a missing sentence | ⚠️ Test first | Longer phrases may sound less natural |
| Replace entire paragraphs | ❌ Re-record instead | AI voice becomes noticeable at length |
Tips for Natural-Sounding Overdub
The AI is good — but not perfect. A few tricks help Overdub blend seamlessly:
Match the energy. If the surrounding audio is enthusiastic, type punctuation that conveys energy. “This is amazing!” will sound different than “This is amazing.”
Keep corrections short. One to five words blend best. Longer phrases are more likely to sound “off.”
Listen in context. Don’t just preview the Overdub clip — play the full sentence. Transitions matter more than isolated playback.
Regenerate if needed. Overdub offers variations. If the first attempt sounds mechanical, regenerate for a different take.
🎯 Pro Tip
Train your voice with varied content. The more diverse your training recording (different tones, speeds, emotions), the better Overdub handles varied corrections. A monotone training script produces a monotone clone.
Free Plan Limitations
Overdub is available on all Descript plans — but with limits:
- Free plan — 1,000-word vocabulary (common words only)
- Creator plan — Unlimited vocabulary
- Pro plan — Unlimited vocabulary + additional voice slots
On the free plan, if we try to Overdub an uncommon word, Descript may not recognize it. For serious YouTube work, the Creator plan removes this limitation.
For a full breakdown of what each plan includes, see our Descript AI Review pricing section.
Ethical Use of Voice Cloning
A quick but important note: Overdub is powerful technology. Descript requires consent verification specifically because voice cloning can be misused.
Always:
- Only clone our own voice
- Disclose AI-generated audio if legally required
- Use for corrections, not deception
According to the FTC’s guidance on AI-generated content, transparency matters. For most YouTube content, minor corrections don’t require disclosure — but creating entirely fake statements would.
The rule is simple: use Overdub to fix honest mistakes, not to fabricate content.
🔄 Traditional Re-Recording
- Set up microphone again
- Match original audio quality
- Record the correction
- Edit the new take into timeline
- Adjust levels to match
✨ Overdub Fix
- Highlight the mistake
- Type the correction
- Click Regenerate
- Done
With Overdub, even post-production mistakes don’t require reshoots. Our video is now fully edited — clean audio, accurate captions, proper chapters, corrected errors. All that’s left is getting it onto YouTube. In the next step, we’ll publish directly from Descript without ever opening YouTube Studio.
9. Step 8 — Publish Directly to YouTube from Descript
Most editing workflows end with an export. We render the video, wait, download the file, open YouTube Studio, upload again, wait again, then manually add titles, descriptions, and tags.
Descript skips all of that.
We can publish directly to YouTube without leaving the app. One click. Video uploads, metadata included, chapters formatted. Done.
Connecting YouTube to Descript
First-time setup takes about 30 seconds:
- Click Publish in the top toolbar
- Select YouTube from the destinations
- Click Connect Account
- Sign in to Google and authorize Descript
- Choose which YouTube channel (if we have multiple)
Once connected, our channel stays linked. Every future project can publish directly — no re-authentication needed.
Adding Video Metadata
Before publishing, Descript prompts us to fill in the essentials:
- Title — The video headline (keep under 60 characters for full display)
- Description — Summary, links, timestamps (chapters auto-populate here)
- Tags — Relevant keywords for discoverability
- Thumbnail — Upload a custom image or select a frame
- Visibility — Public, Unlisted, or Private
- Playlist — Add to an existing playlist (optional)
This is the same information we’d enter in YouTube Studio — just without switching apps.
| Field | Priority | Quick Tip |
|---|---|---|
| Title | Essential | Front-load keywords, keep under 60 chars |
| Description | Essential | First 150 chars show in search — make them count |
| Thumbnail | Essential | Custom thumbnails get 90% more clicks |
| Tags | Helpful | 5-10 relevant tags, mix broad + specific |
| Playlist | Helpful | Groups content, increases session time |
Auto-Generated Descriptions with Underlord
Here’s where it gets even faster. Instead of writing descriptions manually, we can let Underlord generate them:
- In the publish panel, click Generate description
- Underlord analyzes the transcript
- It creates a summary with key points
- Chapters auto-format with timestamps
We should still review and edit — AI-generated descriptions are a starting point, not final copy. But for creators publishing multiple videos per week, this saves significant time.
The combination is powerful: we edit YouTube videos in Descript, generate metadata with AI, and publish in one workflow. No context switching between apps.
Publishing Options
Descript offers three visibility settings at publish:
- Public — Live immediately, visible to everyone
- Unlisted — Accessible via link only (good for client review)
- Private — Only we can see it (for scheduling later in YouTube Studio)
For most creators, the workflow is:
- Publish as Public if ready to go live
- Publish as Private if we want to schedule in YouTube Studio
- Publish as Unlisted for team review before going public
Public
Live instantly. Everyone can find and watch.
Unlisted
Link-only access. Perfect for reviews.
Private
Only us. Schedule later in YouTube Studio.
What About Thumbnails?
Descript lets us upload a custom thumbnail directly in the publish panel. This is important — according to YouTube’s Creator Academy, custom thumbnails dramatically outperform auto-generated ones.
If we don’t have a thumbnail ready, we can:
- Select a frame from the video as a placeholder
- Publish as Private
- Create the thumbnail later and update in YouTube Studio
For creators serious about click-through rates, designing thumbnails before publishing is worth the extra step. But Descript doesn’t block us if we’re not ready.
Direct Publish vs. Export + Manual Upload
When should we publish directly vs. export and upload manually?
⚡ Direct Publish
- One-click from Descript
- Chapters auto-format
- No file downloads needed
- Fastest workflow
📤 Export + Manual Upload
- Full control in YouTube Studio
- Advanced scheduling options
- Premiere features access
- Keep local file backup
For most creators, direct publish is the better choice. It’s faster, simpler, and handles chapters automatically.
Export manually when we need features Descript doesn’t offer — like scheduling a Premiere, using YouTube’s advanced analytics setup, or keeping a local backup of the rendered file.
The Complete One-Click Workflow
Here’s what a full publish looks like:
- Click Publish in the toolbar
- Select YouTube as the destination
- Enter metadata — title, description, tags
- Upload thumbnail (or select a frame)
- Choose visibility — Public, Unlisted, or Private
- Click Publish
Descript renders and uploads simultaneously. Depending on video length, this takes anywhere from a few minutes to 15-20 minutes for longer content.
When it’s done, we get a direct link to the published video. No downloading. No re-uploading. No switching between apps.
💡 Pro Tip
Batch your publishing. Edit multiple videos in one session, then publish them all sequentially. Descript handles the queue — we can set up three videos to publish while we step away. Maximum output, minimum babysitting.
What Happens After Publishing?
Once the video is live, we can still make changes — but in YouTube Studio, not Descript.
If we need to:
- Update the title or description → YouTube Studio
- Replace the thumbnail → YouTube Studio
- Edit the actual video → Re-export from Descript and re-upload
This is why getting it right in Descript matters. The cleaner our edit before publishing, the less cleanup we need afterward.
For creators who want to repurpose this same video into Shorts, Reels, or TikTok clips, our Descript vs CapCut comparison covers how each tool handles short-form optimization differently.
✅ Pre-Publish Checklist
- Title is clear and under 60 characters
- Description has keywords in first 150 characters
- Chapters are formatted with timestamps
- Custom thumbnail is uploaded
- Tags include 5-10 relevant keywords
- Visibility is set correctly
- Video has been previewed one final time
Our video is live. Edited, polished, captioned, chaptered, and published — all without leaving Descript. But which plan actually makes sense for our workflow? In the next section, we’ll break down Descript’s pricing so we can choose the right tier without overpaying.
10. Which Descript Plan Do YouTubers Need?
Descript offers a free plan — and it’s genuinely usable. But once we edit YouTube videos in Descript regularly, the limits become noticeable.
Here’s the real question: which plan matches our actual workflow? Not the plan with the most features — the one that fits how often we publish and what we need.
The Three Plans That Matter
Descript has four tiers, but for most YouTubers, only three are relevant:
- Free — Testing the workflow, occasional edits
- Creator — Weekly publishing, solo creators
- Pro — Daily publishing, teams, advanced AI features
Enterprise exists but targets large organizations. Unless we’re running a media company, we can ignore it.
| Feature | Free $0/month |
Creator $12/month |
Pro $24/month |
|---|---|---|---|
| Transcription hours | 1 hr/month | 10 hrs/month | 30 hrs/month |
| Export quality | 720p + watermark | 1080p, no watermark | 4K, no watermark |
| Studio Sound | ✓ | ✓ | ✓ |
| Filler word removal | ✓ | ✓ | ✓ |
| Overdub vocabulary | 1,000 words | Unlimited | Unlimited |
| Underlord AI | Limited | Full access | Full access |
| Direct YouTube publish | ✓ | ✓ | ✓ |
| Team collaboration | — | 1 editor | Multiple editors |
Which Plan Makes Sense?
The decision is simpler than it looks:
Choose Free if:
- We’re testing Descript for the first time
- We publish less than once per month
- We don’t mind the 720p watermark
Choose Creator ($12/month) if:
- We publish weekly or bi-weekly
- We need 1080p exports without watermarks
- We want unlimited Overdub vocabulary
Choose Pro ($24/month) if:
- We publish multiple times per week
- We work with a team or editor
- We need 4K exports or advanced AI features
For most solo YouTubers, Creator is the sweet spot. It removes the annoying limitations (watermark, 720p cap, Overdub restrictions) without paying for team features we don’t need.
Free
Testing the workflow. 1 video to try it out.
Creator
Weekly YouTubers. Best value for solo creators.
Pro
Teams and power users. Multiple videos per week.
The Real Cost Question
Here’s how to think about it: how much time does Descript save?
If we edit YouTube videos in Descript instead of traditional software, most creators report cutting editing time by 40-60%. On a 15-minute video, that’s roughly 1-2 hours saved per edit.
At $12/month for Creator, the tool pays for itself after one video — if our time is worth anything at all.
According to Creator Economy research from Kajabi, time is the number one constraint for independent creators. Tools that save hours per week directly impact how much we can publish — and how fast we can grow.
Billing: Monthly vs. Annual
Descript offers both options:
- Monthly — Full flexibility, cancel anytime
- Annual — Roughly 20% discount, paid upfront
If we’re committed to using Descript for the year, annual makes sense. If we’re still testing the workflow, monthly keeps us flexible.
One approach: start with monthly Creator for 2-3 months. If it sticks, switch to annual and pocket the savings.
Ready to Edit YouTube Videos Faster?
Start with the free plan to test the workflow. Upgrade to Creator when the limits feel too tight.
What About Alternatives?
Descript isn’t the only option. If our workflow is primarily short-form content (Reels, TikTok, Shorts), tools like CapCut may be more efficient — and cheaper.
The key difference:
- Descript excels at long-form, dialogue-heavy content where text-based editing and audio cleanup matter
- CapCut excels at visual effects, templates, and fast social-first edits
For creators who do both, using Descript for long-form YouTube and CapCut for short-form repurposing is a common workflow.
Our Descript vs CapCut comparison breaks down exactly when each tool wins — and when it makes sense to use both.
🤔 Quick Decision Guide
Pricing sorted. But before we wrap up, there are a few workflow tricks that separate casual users from creators who edit YouTube videos in Descript like pros. In the next section, we’ll cover the shortcuts and habits that save even more time.
11. Pro Tips for Faster YouTube Editing in Descript
The basics get us editing. But the difference between a 2-hour edit and a 45-minute edit comes down to workflow habits — small decisions that compound across every project.
These are the tricks that experienced creators use to edit YouTube videos in Descript faster, without cutting corners on quality.
1. Create a Project Template
Starting from scratch every time wastes minutes. Instead, build a reusable template:
- Create a new project called “YouTube Template”
- Add placeholder tracks for intro, outro, and music
- Set up our preferred caption style
- Configure export settings (resolution, format)
- Save it
For each new video, duplicate the template and rename it. Our settings carry over — no reconfiguring.
📁 What to Include in Our Template
2. Use Compositions for Repeatable Elements
Intros, outros, lower thirds, subscribe reminders — these appear in every video. Instead of rebuilding them each time, save them as Compositions.
A Composition is a reusable clip we can drop into any project. Edit it once, and every project using that Composition updates automatically.
To create one:
- Build the element (intro, lower third, etc.)
- Select all the clips
- Right-click → Create Composition
- Name it clearly (e.g., “Channel Intro v3”)
Next video: drag the Composition in. Done in seconds.
3. Batch Filler Removal Before Detailed Editing
We covered filler word removal in Step 3 — but when we do it matters.
Run filler removal immediately after import, before any other edits. Why? Because removing filler words shifts the timeline. If we’ve already made precise cuts, those cuts may land in the wrong spots after filler removal adjusts everything.
The order that saves headaches:
- Import footage
- Run filler removal
- Shorten word gaps
- Apply Studio Sound
- Then start detailed editing
⚡ Optimal Editing Order
4. Edit at 1.5x Playback Speed
We mentioned this in Step 2, but it bears repeating: reviewing footage at normal speed is slow.
Descript’s transcript lets us skim visually, but when we need to watch a section, 1.5x playback cuts review time by a third. Our ears adjust quickly — dialogue remains understandable, but pauses and hesitations become more obvious.
Use Shift + faster to increase speed, Shift + slower to decrease. Find the pace that lets us catch issues without wasting time.
5. Learn the Keyboard Shortcuts That Matter
We covered basics in Step 2. Here are the power-user shortcuts that save even more time:
| Shortcut | Action | Time Saved |
|---|---|---|
| E | Toggle Ignore (hide without deleting) | ~2 min/edit |
| Cmd/Ctrl + Shift + K | Split clip at playhead | ~30 sec/split |
| M | Add marker for notes | Faster review |
| Cmd/Ctrl + D | Duplicate selected clip | ~15 sec/use |
| J / K / L | Rewind / Pause / Forward | Hands on keyboard |
| Cmd/Ctrl + / | Show all shortcuts | — |
The J-K-L navigation comes from traditional video editing software. Tapping L multiple times increases forward speed; J does the same in reverse. K stops playback. Once this becomes muscle memory, we never touch the mouse for navigation.
Descript’s full shortcut list is available in their keyboard shortcuts documentation — worth bookmarking.
6. Use Markers for Review Notes
When reviewing a cut, we’ll spot issues: a section that needs trimming, a word that sounds off, a transition that feels abrupt.
Instead of fixing each one immediately (and losing our place), add a marker:
- Press M at the problem spot
- Type a quick note (“trim this,” “fix audio,” “add b-roll”)
- Continue reviewing
After the full review, jump between markers and fix everything in one pass. Faster than stopping and starting repeatedly.
7. Name Projects Consistently
This sounds minor until we have 50 projects and can’t find anything.
A simple naming convention:
[Date] - [Video Title] - [Status]
Examples:
2026-03-10 - Descript Tutorial - DRAFT2026-03-10 - Descript Tutorial - FINAL2026-03-10 - Descript Tutorial - PUBLISHED
When we search later, dates sort chronologically, titles are findable, and status tells us what’s ready versus what needs work.
📝 Project Naming: Before → After
8. Export While Doing Other Work
Rendering takes time. Instead of watching the progress bar, batch our workflow:
- Finish editing Video A
- Start export
- Import footage for Video B while A renders
- Begin rough cut on B
Descript handles export in the background. We don’t need to babysit it. By the time Video B’s rough cut is done, Video A is ready to publish.
9. Use “Remove Retakes” for Interview-Style Content
Recording multiple takes of the same line? Descript’s Remove Retakes feature (mentioned in Step 2) becomes essential for:
- Tutorial voiceovers where we re-record sentences
- Interview footage with repeated answers
- Any content where we say the same thing multiple ways
Underlord identifies duplicate content and keeps the best version. What would take 20 minutes of manual comparison happens in seconds.
10. Review in a Different Environment
This isn’t Descript-specific, but it matters: export a low-res draft and watch it somewhere else.
- On our phone with headphones
- On a TV across the room
- The next morning with fresh eyes
Issues we miss on the editing screen become obvious in a different context. Pacing problems, audio imbalances, awkward transitions — they reveal themselves when we’re not zoomed into the timeline.
According to research on creative review processes, stepping away from the editing environment reduces cognitive fatigue and improves error detection. A 10-minute break before final review catches more mistakes than an extra hour of editing.
💡 The 24-Hour Rule
For important videos, never publish the same day we finish editing. Sleep on it. Watch it once more tomorrow. The mistakes we catch in that final review are always the ones viewers would have noticed first.
⚡ Pro Tips Quick Reference
These habits compound. Individually, each saves a few minutes. Together, they can cut our editing time in half — and make the process feel smoother.
But even with the best workflow, things go wrong. In the next section, we’ll cover the most common issues when editing YouTube videos in Descript, and how to fix them fast.
12. Common Issues and How to Fix Them
Even the best tools have rough edges. When we edit YouTube videos in Descript regularly, we’ll eventually run into something that doesn’t work as expected.
This section covers the most common problems — and their fastest fixes. Bookmark it for when things go wrong.
Transcription Accuracy Issues
The transcription isn’t perfect. We see words that don’t match what we said, names spelled wrong, or entire phrases that make no sense.
Why it happens:
- Background noise interferes with voice detection
- Speaking too fast or mumbling
- Overlapping speakers
- Unusual accents or technical jargon
- Low-quality microphone
How to fix it:
Before recording:
- Use a decent microphone (even a $50 USB mic helps)
- Record in a quiet environment
- Speak clearly and at a moderate pace
- Pause briefly between sentences
After import:
- Manual correction: Alt/Option + click on wrong words
- Let Descript re-transcribe if accuracy is below 85%
- Add technical terms to our vocabulary (Settings → Vocabulary)
For deeper guidance on transcription accuracy across AI tools, our guide on why AI meeting notes go wrong covers the root causes and prevention strategies that apply to video transcription too.
Audio and Video Out of Sync
The video shows us speaking, but the audio doesn’t match. Lips move before or after the sound.
Why it happens:
- Variable frame rate (VFR) source footage
- Import from screen recording software
- Mixed frame rates in the same project
- Large file sizes causing processing lag
How to fix it:
- Check source footage — Record in constant frame rate (CFR) when possible
- Re-import the file — Sometimes a fresh import resolves sync issues
- Use Descript’s sync tools — Right-click the clip → Resync media
- Convert before import — Use Handbrake to convert VFR footage to CFR
If the issue persists, export a short test clip to confirm sync before finishing the full edit.
| Problem | Quick Fix | If That Doesn't Work |
|---|---|---|
| Audio/video out of sync | Right-click → Resync media | Convert source to CFR before import |
| Export stuck or fails | Clear cache + restart Descript | Export in smaller segments |
| Project running slow | Close other apps + reduce preview quality | Work with proxy files for 4K footage |
| YouTube won't connect | Disconnect + reconnect account | Check YouTube API status |
| Captions off by seconds | Check for edited timeline gaps | Re-generate captions from transcript |
Export Failures or Stuck Progress
We click Export, the progress bar moves, then… nothing. Export fails, freezes, or produces a corrupted file.
Why it happens:
- Insufficient disk space
- Memory overload with long projects
- Corrupted media file somewhere in the timeline
- Network issues (for cloud-based exports)
How to fix it:
- Check disk space — Exports need temporary space (often 2-3x the final file size)
- Close other applications — Free up RAM for processing
- Clear Descript’s cache — Settings → Clear cache → Restart
- Export in segments — Split the project and export sections separately
- Try a different format — Switch from MP4 to MOV (or vice versa)
If one specific section keeps failing, that section likely contains a corrupted clip. Identify it by exporting progressively larger portions until the failure point appears.
Project Running Slowly
Timeline lags. Playback stutters. Every click takes seconds to register.
Why it happens:
- 4K footage without proxy files
- Too many effects applied simultaneously
- Insufficient RAM (Descript recommends 16GB+)
- Background processes consuming resources
How to fix it:
Immediate fixes:
- Reduce preview quality (Settings → Playback → Lower resolution)
- Close browser tabs and other applications
- Disable effects temporarily while editing
Long-term fixes:
- Create proxy files for 4K footage before editing
- Upgrade RAM if consistently hitting limits
- Keep projects under 60 minutes (split longer content)
Heavy projects with lots of Studio Sound processing, captions, and B-roll will always be slower than simple talking-head edits. If performance matters more than convenience, consider applying Studio Sound as the last step before export.
YouTube Connection or Upload Errors
We try to publish directly to YouTube, but Descript can’t connect or the upload fails partway through.
Why it happens:
- YouTube API authorization expired
- YouTube is experiencing outages
- Network connection instability
- Account permissions changed
How to fix it:
- Disconnect and reconnect — Settings → Integrations → YouTube → Disconnect, then reconnect
- Check YouTube status — Visit YouTube’s status page or Downdetector
- Test with a short clip — Upload a 30-second test before committing to a long video
- Export manually — If direct publishing keeps failing, export the file and upload through YouTube Studio
The direct publishing feature is convenient, but YouTube’s API occasionally has hiccups. When deadlines matter, exporting locally is more reliable.
Chapters Not Appearing on YouTube
We published with chapters, but YouTube shows a solid progress bar. No chapter markers visible.
Why it happens:
- First chapter doesn’t start at 0:00
- Fewer than 3 chapters total
- Chapters shorter than 10 seconds
- Timestamps not formatted correctly in description
- YouTube still processing (can take up to 24 hours)
How to fix it:
- Verify first chapter starts at 0:00 — This is required
- Check chapter count — Minimum 3 chapters for YouTube to enable them
- Confirm each chapter is 10+ seconds — Shorter chapters get ignored
- Check description format — Timestamps must be in
0:00or00:00format - Wait for processing — YouTube sometimes delays chapter activation
If chapters exported from Descript aren’t working, copy them into YouTube Studio manually and verify the format matches YouTube’s requirements exactly.
⚠️ YouTube Chapter Requirements
- First chapter MUST start at 0:00
- Minimum 3 chapters required
- Each chapter must be at least 10 seconds
- Timestamps format: 0:00 or 00:00:00
- Processing can take up to 24 hours
Overdub Sounds Unnatural
The AI-generated audio doesn’t match our real voice. It sounds robotic, monotone, or obviously synthetic.
Why it happens:
- Training recording was too short or monotone
- Correction is too long (multiple sentences)
- Energy level mismatch with surrounding audio
- Uncommon words not in vocabulary
How to fix it:
- Keep corrections short — 1-5 words blend best
- Match energy with punctuation — “Amazing!” sounds different than “Amazing.”
- Regenerate — Click regenerate for a different take
- Retrain voice — If consistently bad, record a new training set with more vocal variety
- Re-record instead — For longer passages, traditional recording sounds better
Overdub works best for quick fixes. If we need to change entire sentences, re-recording usually produces better results.
Captions Timing Off
Captions appear too early or too late relative to the speech. Words display before or after we say them.
Why it happens:
- Timeline edits shifted audio without updating captions
- Manual caption adjustments created drift
- Imported captions from external source
- Export settings causing offset
How to fix it:
- Regenerate captions — Delete existing captions and recreate from transcript
- Check timeline edits — Heavy cuts can cause timing drift
- Preview before export — Watch the full video with captions enabled
- Adjust offset — Some players allow caption timing offset adjustment
Since captions in Descript are generated from the transcript, regenerating them usually resolves timing issues caused by editing.
📞 When to Contact Descript Support
Most issues have quick fixes. But reach out to Descript's support team when:
- Exports consistently fail despite troubleshooting
- Account or billing issues prevent access
- Features aren't working as documented
- Overdub voice model needs deletion or reset
Submit a ticket through Descript's Help Center.
Most problems have quick fixes. The key is knowing where to look. With these solutions bookmarked, we can get back to editing fast — and finish that YouTube video.
Now let’s wrap up with the final verdict: who should use Descript for YouTube, and when does it make sense to try something else?
13. Final Verdict
We’ve covered the full workflow — from importing footage to publishing directly to YouTube. Eight steps that replace hours of traditional editing with a faster, text-based approach.
Now the real question: is Descript right for our channel?
Who Should Use Descript for YouTube
Descript makes sense for creators who:
- Create talking-head content — Tutorials, reviews, commentary, vlogs
- Value speed over cinematic polish — Good enough faster beats perfect eventually
- Hate timeline scrubbing — Text-based editing feels more natural
- Need clean audio without expensive gear — Studio Sound handles the heavy lifting
- Publish consistently — Weekly or more, where time savings compound
If we edit YouTube videos in Descript regularly, the efficiency gains are real. What used to take 2-3 hours can drop to under an hour. For creators who publish weekly, that’s 100+ hours saved per year.
When Descript Might Not Be the Best Fit
No tool is perfect for everyone. Consider alternatives if:
- We need advanced visual effects — Motion graphics, complex compositing, color grading
- Our content is heavily B-roll driven — Music videos, cinematic vlogs, documentaries
- We prefer traditional timeline editing — Some editors simply think better in waveforms
- Short-form is our only focus — Tools like CapCut are built specifically for Reels/TikTok
For creators who need both long-form and short-form workflows, many use Descript for the main edit, then export clips to other tools for social optimization. Our Descript vs CapCut comparison breaks down exactly when each tool wins.
✅ Descript Is Perfect For
- YouTubers who talk to camera
- Tutorial and educational creators
- Podcasters repurposing to video
- Solo creators without editors
- Anyone who publishes weekly+
⚠️ Consider Alternatives For
- Cinematic / documentary content
- Heavy motion graphics work
- Pure short-form (Reels only)
- Team workflows needing Premiere/Resolve
The Bottom Line
Here’s what matters: Descript removes friction from the editing process.
It won’t replace a professional colorist. It won’t create Hollywood-level motion graphics. But for the vast majority of YouTube creators — people making tutorials, reviews, commentary, vlogs, and educational content — it handles 90% of the work in a fraction of the time.
The text-based workflow isn’t a gimmick. Once we experience deleting a sentence by highlighting and pressing backspace, traditional timeline editing feels slow by comparison.
The AI features aren’t perfect, but they’re good enough to matter:
- Studio Sound makes bad audio usable
- Filler removal saves 30+ minutes per video
- Chapters generate themselves
- Overdub fixes mistakes without reshoots
- Direct publishing skips the YouTube Studio dance
For creators who publish consistently, these small efficiencies compound into serious time savings.
Start with the Free Plan. Upgrade When the Limits Hit.
The free tier is genuinely usable — enough to test the full workflow on a real video. Once we're editing weekly and hitting transcription limits, Creator ($12/month) unlocks everything most YouTubers need.
Editing shouldn’t be the bottleneck. With the right workflow, it becomes the fastest part of creating — leaving more time for what actually matters: making content worth watching.
Now go publish something.
14. FAQ — Editing YouTube Videos in Descript
Quick answers to the most common questions about using Descript for YouTube editing.
Frequently Asked Questions — Editing YouTube Videos in Descript
Is Descript good for editing YouTube videos?
+Yes — especially for talking-head content, tutorials, and vlogs. Descript's text-based editing lets you cut video by deleting words from the transcript, which is significantly faster than traditional timeline editing for dialogue-heavy content.
It's less ideal for cinematic content that leans heavily on B-roll, motion graphics, or advanced color grading. For those workflows, traditional editors like Premiere Pro or DaVinci Resolve give you more control.
Can I publish directly to YouTube from Descript?
+Yes. Descript has a built-in YouTube publishing integration — connect your account, add title, description, tags, thumbnail, and chapters, then publish without opening YouTube Studio.
The video renders and uploads in one step, with chapters auto-formatted into the description. For most creators, that saves 10–15 minutes per upload.
Is Descript free for YouTube creators?
+Descript's Free plan includes 1 hour of transcription a month and exports at 720p with a watermark — enough to test the full workflow on a real video.
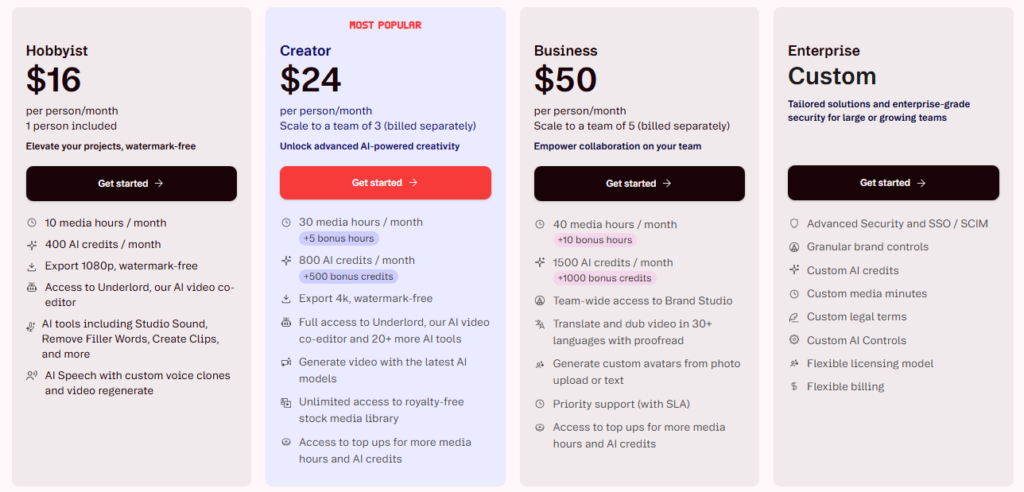
For regular publishing, most creators move to Hobbyist ($16/month billed annually) to drop the watermark and unlock 1080p, or Creator ($24/month annually) for 4K exports and Descript's full AI toolkit. Prices verified against Descript's current pricing page, August 2026.
How long does it take to edit a YouTube video in Descript?
+Most creators report cutting editing time by roughly 40–60% compared to a traditional timeline editor — a 15-minute talking-head video that might take a couple of hours in Premiere often finishes in under 90 minutes in Descript.
The biggest gains come from text-based editing, one-click filler-word removal, automatic captions from the transcript, and AI-generated chapters. The more dialogue-heavy your content, the more time you'll save.
Does Descript add a watermark to YouTube videos?
+Only on the Free plan — exports include a small Descript watermark and cap out at 720p.
Hobbyist ($16/month annually) and above remove the watermark and unlock higher resolutions — 1080p on Hobbyist, 4K on Creator and Business. For serious YouTube work, a paid plan is worth it just to lose the watermark.
Can Descript automatically add chapters to my YouTube video?
+Yes — Descript's Underlord AI can analyze your video and generate chapter markers with timestamps and titles automatically. You can adjust the count and edit titles before publishing.
When you publish or export with chapters enabled, timestamps format correctly in the description. YouTube requires chapters to start at 0:00, at least 3 total, and each one at least 10 seconds — Descript handles all of that for you.
What's the difference between Descript's Free and Hobbyist plans?
+Free gives you 1 hour of media a month, 720p watermarked exports, and a taste of Underlord's AI tools — enough to try the workflow, not enough for a real channel.
Hobbyist ($16/month annually, $24 month-to-month) jumps to 10 hours of media, 1080p exports with no watermark, and full access to Studio Sound, filler-word removal, and voice cloning. For most weekly YouTubers, that's the real starting tier.
Can I edit YouTube videos in Descript on my phone?
+Not really — Descript's own help documentation confirms there's no dedicated mobile app for editing. You can upload footage from your phone, but the actual editing tools only work on desktop or the web app.
If a phone-first workflow matters more to you than text-based editing, a mobile-native tool like CapCut fits that use case better. Descript is built for a proper editing session, not editing between errands.